You have heard about people making money through niche sites and you are thinking about giving it a try? In this article you will learn how to set up your first niche site in eight easy steps.
Building a niche site is a great way to create a passive source of income around something you love. A niche site is essentially a website that provides valuable and helpful content around a specific niche. A niche site acts as an information resource for people who are interested in that particular niche. Once you grow significant traffic for your niche site, you can then monetize it through various means, such as display advertising, affiliate marketing, or selling your own products and services.
In this article, we are going to take a look at the step by step process of building a niche site like a pro using WordPress. WordPress is the perfect solution for building a niche site because it makes everything simple and gives you total control over your website, even if you are just a beginner. This means that you can build a professional niche site even if you don’t know how to write a single line of code. Sounds exciting? Let’s get started.
Step 1: Choose Your Niche
Before you build a niche site, you first need to decide the niche you will focus on. This is basically the topic around which your site will be focused. You can choose anything as your niche – forex trading, swimming, martial arts, cooking, and so on. The idea is to simply choose a narrow topic and try to become the go-to online resource for anyone looking for information about that topic. Since you want to become the best in your niche, you should go for a niche that has low competition. You should also choose a niche which you are passionate about. Tools like Google Keyword Planner, BuzzSumo and SEMRush can help you research the competitiveness of your chosen niche.
Step 2: Pick A Good Domain Name
A domain name is the address that people will use to find your niche site. For instance, the domain name for this blog is kryptonitewp.com. You need to choose a good domain name because it determines the success of your niche site. Generally, a good domain name should be short, memorable, easy to spell, and related to your niche. You should go for a .com extension on your domain, instead of other extensions like .net. You should also avoid using numbers or hyphens in your domain name. Finally, the perfect domain name should give your visitors a good idea of what your website is about.
Step 3: Get Hosting For Your Website
If the domain name is like an address, then hosting is like a home for your site. It is where your site lives on the internet. This is where the files and content on your website are hosted. There are various web hosts that you can use for your niche site, such as Bluehost. It is advisable to buy your domain and host your niche site with the same company.

Step 4: Install WordPress On Your Site
Now that you have your domain and hosting set up, the next thing you need to do is to install WordPress on your site. This will allow you to build your niche site using WordPress, the world’s most popular CMS. Installing WordPress is easy. All you need to do is log in to your hosting account, scroll down to the “Install WordPress” icon and then follow the prompts to install WordPress with just a few clicks. If you don’t want to install WordPress yourself, you can find someone to do it for you on Codeable.io.

Step 5: Upload A Theme To Your WordPress Niche Site

Like I said earlier, WordPress allows you to build your niche site without having to code. This is done through WordPress themes, which allow you to automatically configure a professional layout for your site. When selecting a WordPress theme for your site, you should go for simplicity, responsiveness, browser compatibility, compatibility with popular plugins, and SEO friendliness. There are several free and premium WordPress themes to choose from.
Step 6: Install Important Plugins
One thing that makes WordPress so great is that it offers numerous plugins that allow you to automatically add any type of functionality to your site. Now that you have installed your preferred theme, the next step is to install important WordPress plugins that will help you get the most out of your site. Some important plugins you might need to install include YoastSEO, Cachify and WPForms.
Step 7: Add Content
Your niche site is almost ready. All you need to do now is add some content. Remember, you want your niche site to become the go-to resource for people searching for information about that particular topic. Give your readers useful and detailed information covering all relevant aspects and answer questions they might have, when coming to your site. In addition, you can of course introduce products that fit your niche site and could help the readers. Or you can set up a product comparison making it easier for visitors to make a purchase decision. Ensure the content you add on your site is engaging, insightful and helpful.
Step 8: Add Monetization Opportunities
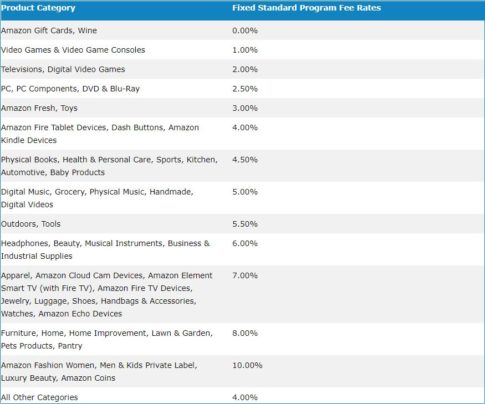
Of course, one of the reasons why you start a niche site is that you would like to build a passive income with it and there are several ways to do so. One of them is the Amazon Associates Program. With this program, you can promote Amazon products on your niche site and receive a commission from Amazon for every completed purchase through your website. The commissions vary depending on the product category, but are quite worthwhile.
You can manually add any Amazon product to your niche site or you can use a plugin that will do the job for you. A very simple, clear and practical option is for example the AAWP plugin. With this plugin you can promote individual Amazon products in different ways or even incorporate entire bestseller lists or new releases in your page. This way you offer the perfect value to your visitors and at the same time earn some money with it.
There you go – your first niche site is ready to go live!
That’s it! With these 8 simple steps, your niche site is now ready. You can start driving traffic to the site, working on SEO and optimizing monetization.