Here you find all relevant information, instructions and tips for installing, configuring and using the Twitch for WordPress plugin. This site will be kept up2date and offers you a comfortable and smooth start.
Technical requirements
Please ensure that your web hosting meets the following requirements:
- PHP 5.3 or later
- MySQL 5.0.3 or later
- WordPress 3.4 or later (tested up to the current version)
- PHP curl extension installed
In general the above-mentioned requirements are easily met by all web hosting providers. For a fast Wordpress WebHosting we recommend Bluehost.
Plugin installation
Installation via WordPress Dashboard
- Navigate to the ‘Add New’ in the plugins dashboard
- Search for ‘twitch for wordpress’
- Click ‘Install Now’
- Activate the plugin on the Plugin dashboard
Installation via Uploader
- Login to your WordPress dashboard
- Navigate to Plugins and click Add New
- Click “Upload Plugin”
- Select the previously downloaded zip file and confirm by clicking Install Now
Installation via FTP
- Extract the downloaded.zip file on your computer
- Upload the extracted directory to the /wp-content/plugins/ directory
- Login to your WordPress dashboard
- Navigate to Plugins and activate the plugin
That’s it!
Inside the following chapters, you learn how to configure and use the plugin correctly.
Twitch API Credentials
As you know, our plugin makes use of the official Twitch™ API in order to fetch data of streams and their users.
Without having access to their API, you’re not able to use our plugin. So let’s dig into the process of creating your Twitch™ application and get the required API credentials.
Step 1: Register your Application
Visit https://glass.twitch.tv/console/apps/create and register a new application for your website.

| Field | Description |
|---|---|
| Name | Enter a name for your application which describes your use case at best: e.g. My Website Integration |
| OAuth Redirect URL | Enter the URL of your website: e.g. https://my-domain.com |
| Category | Select Website Integration |
Click on Create and follow the next step.
Step 2: Get your API credentials
After creating your application, you got redirected to the applications overview page. Here click on “Manage” besides the recently created application.
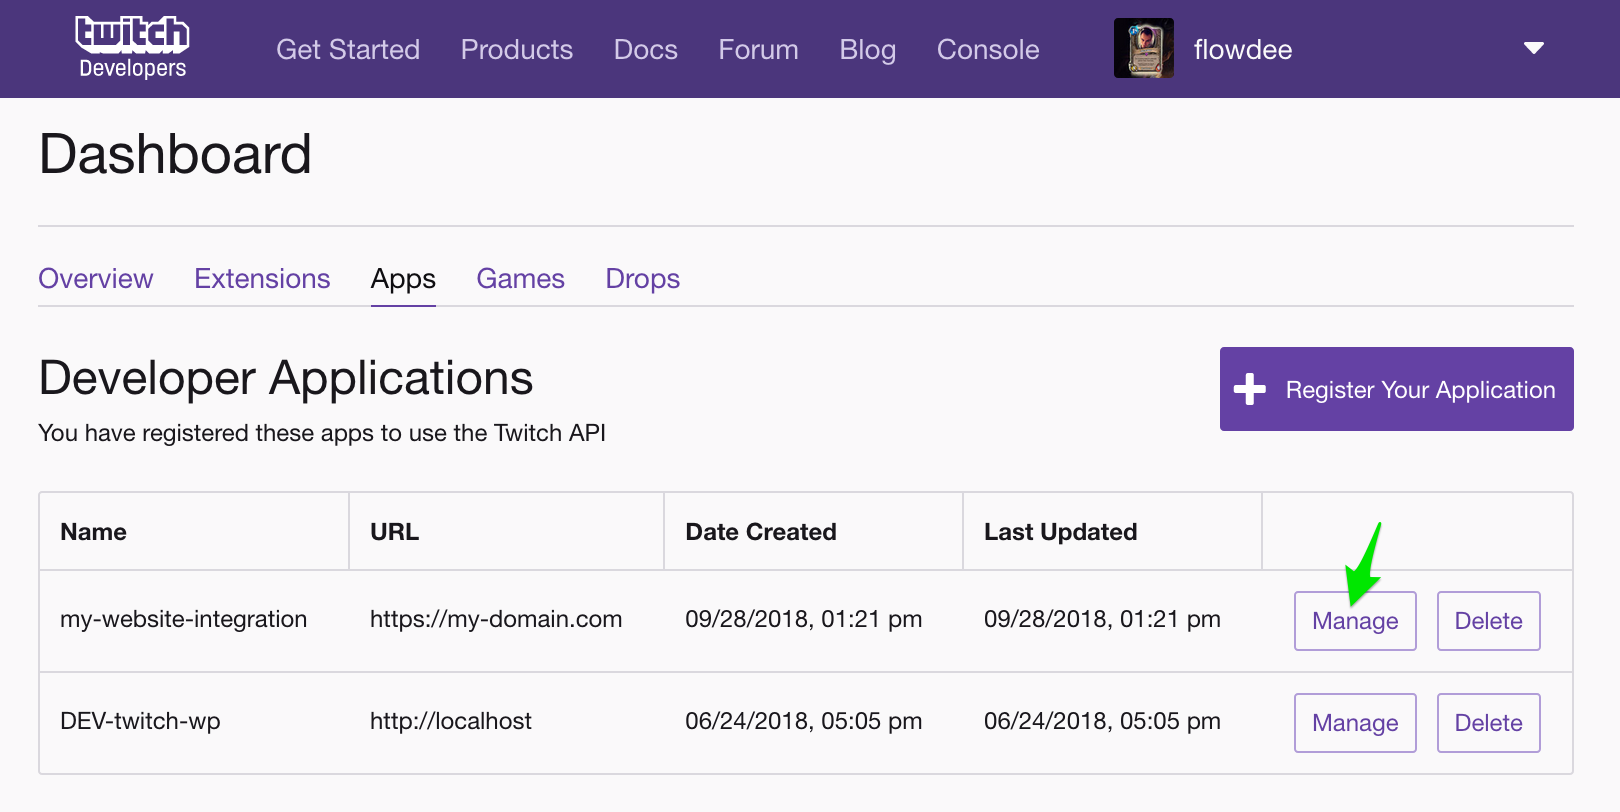
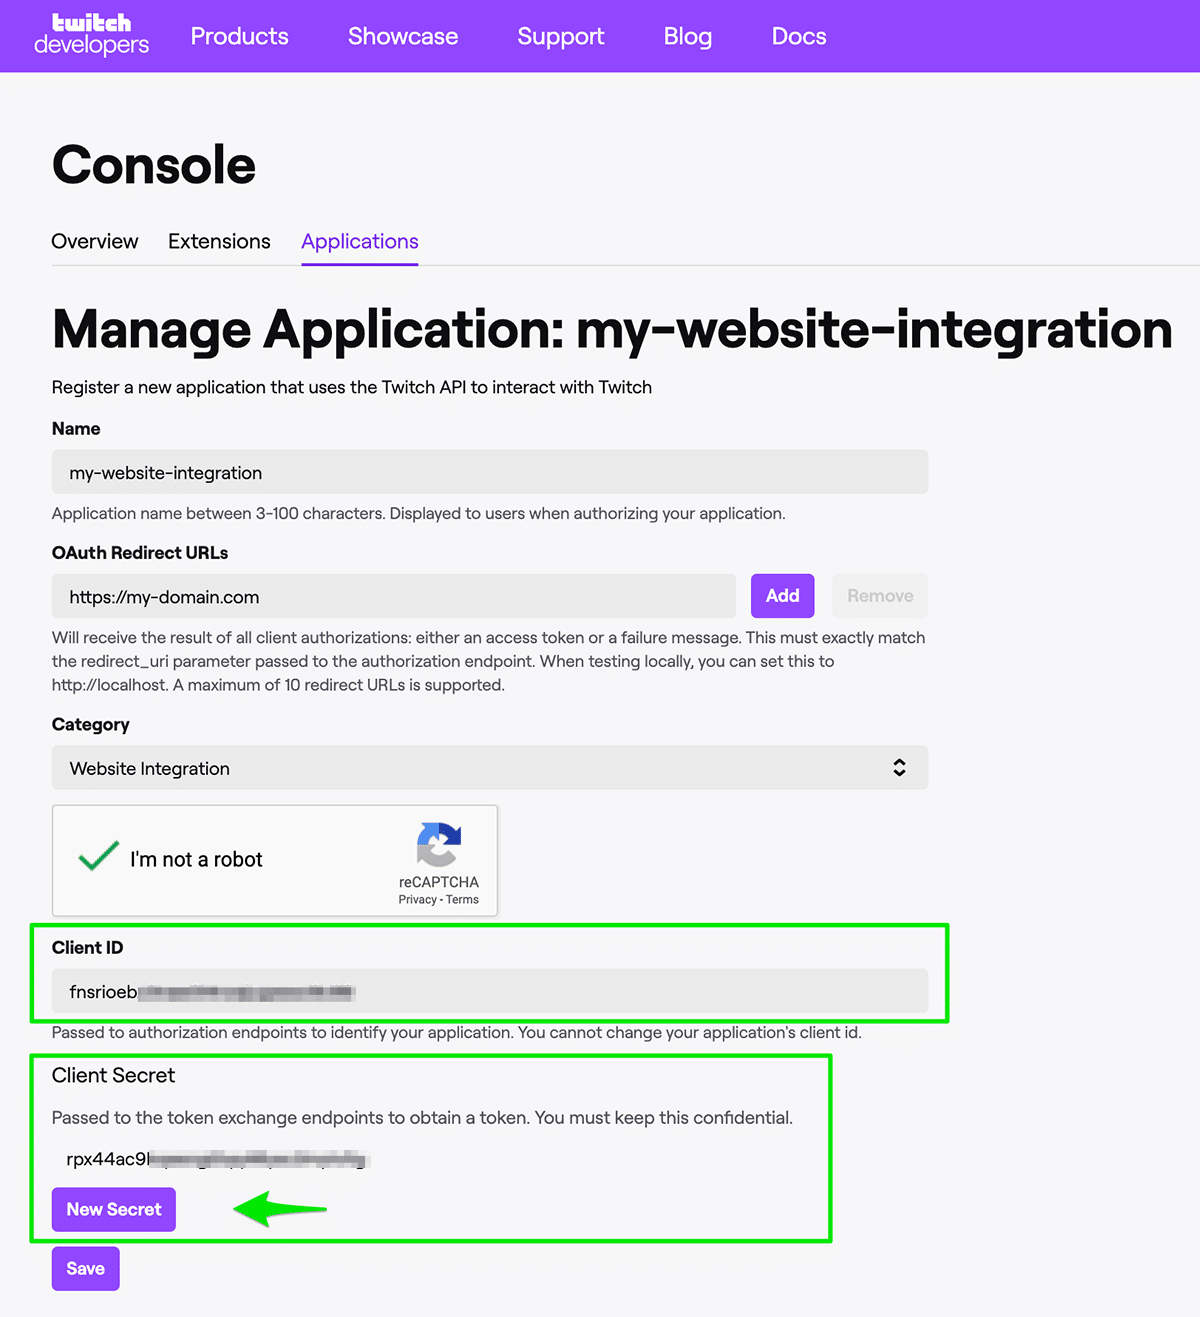
On the “Manage Application” screen you can find your personal API credentials which will be used for making API calls.
Plugin Settings
The plugin settings page can be found when navigating as follows: Settings – Twitch.
Licensing (Pro Version only)
In order to make use of our pro version and regularly receive updates, please enter your license key which can be found in your purchase confirmation email.
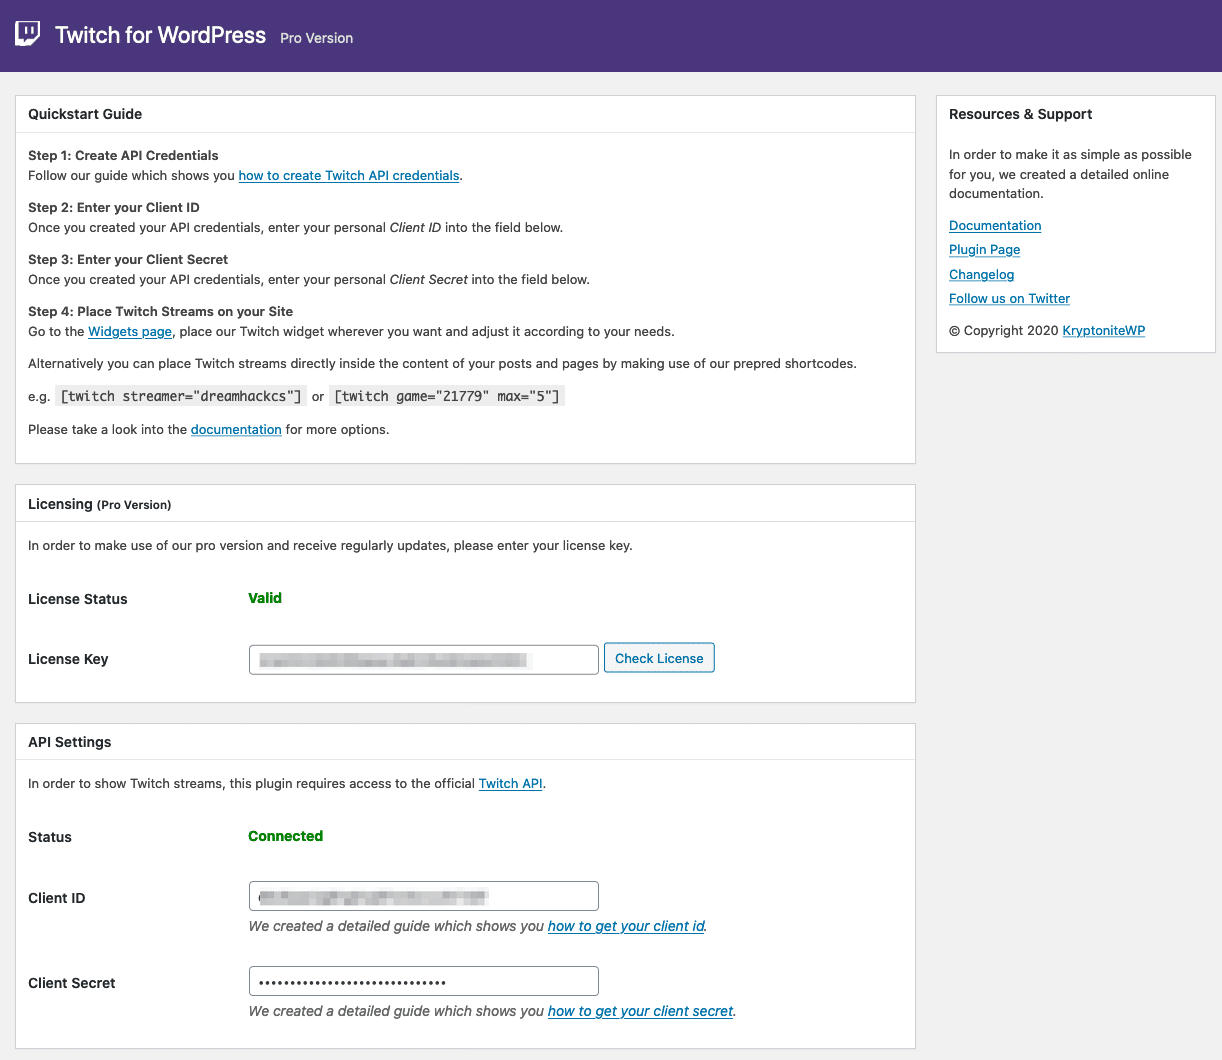
API
Please enter your Client ID which must be created as shown in section 2 of this documentation.

General
Cache Duration
Data which was fetched from the API will be temporarily stored in order to improve the page loading time. After expiration, the API will be called again and the stored data renewed.
In case you’re using a caching plugin, it makes no sense to select a lower value than the caching interval of your caching plugin.
No Streams Found
Specify what happens when no streams were found: Either show the message “No streams found.”, hide it or only show it to site administrators.
Language
This setting is very helpful if you want to want to display streams of a certain game, in a certain language. For instance: Showing Hearthstone streams in German language only.
Styles
The following styles are available:
| Name | Value | Free Version | Pro Version |
|---|---|---|---|
| Default | white |
||
| Dark | dark |
||
| Light | light |
||
| Navy Blue | navy |
||
| Green | green |
A demonstration of all different styles can be found on the demo page.
Sizes
The following sizes are available:
| Name | Value | Description |
|---|---|---|
| Large | large |
Displays all streams in a large template. |
| Small | small |
Displays all streams in a small template. |
| First Large, Others Small | large-first |
Displays the first stream in a large template, all following streams in a small template. |
A demonstration of all different sizes can be found on the demo page.
Preview Types
The following preview types are available:
| Name | Value | Description |
|---|---|---|
| Image | image |
Displays all streams by showing an image. |
| Video | video |
Displays all streams by showing live videos. |
| First Video, Others Images | video-first |
Displays the first stream as live video, all following streams as images. |
A demonstration of all different preview types can be found on the demo page.

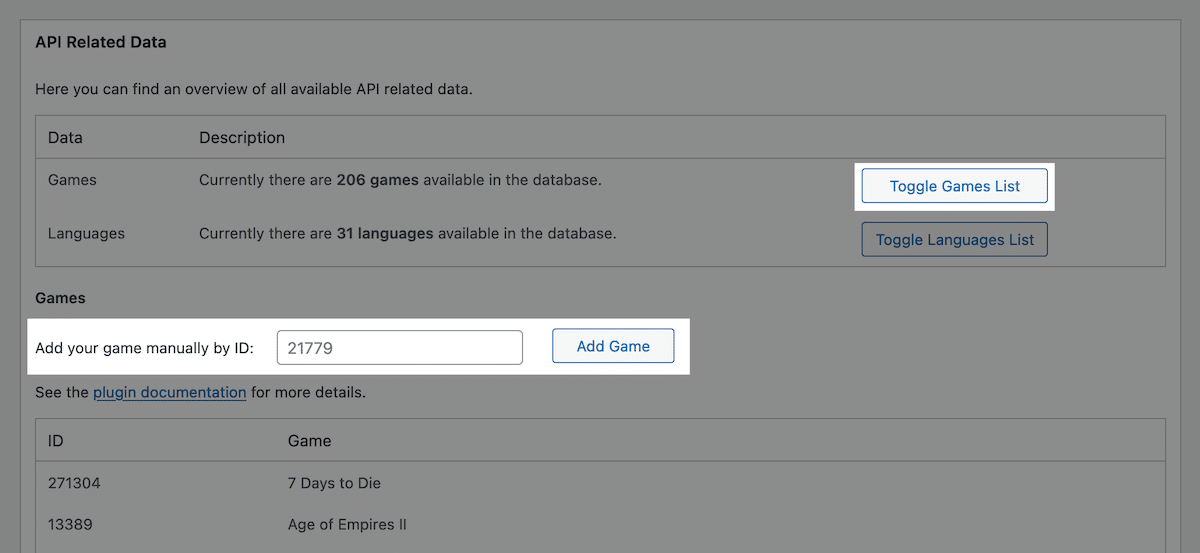
API Related Data
Here you can take a look into the data which comes from the API and will be used as options for selecting a stream’s language, game etc.
Help & Support
Here you can find further information when running into any technical issues.
How-to add a game via ID
Because the Twitch API only returns the top 100 games by default, it may happen that your desired game is not included.
In this case, you can add the game manually. For this, you need the game ID, which you can find out via your browser.
- Visit the detail page of the game you want to add, e.g. https://www.twitch.tv/directory/game/Fortnite
- Open your browser’s Web Developer Tools with a right-click on a free area and select Inspect element. Alternatively, you can use the browser’s menu or keyboard shortcut
- Go to the Network tab and filter the results by XHR
- Look for a row with the file name gpl and click on it
- Now you should find a response object with an ID and a numeric value, which is the actual game ID
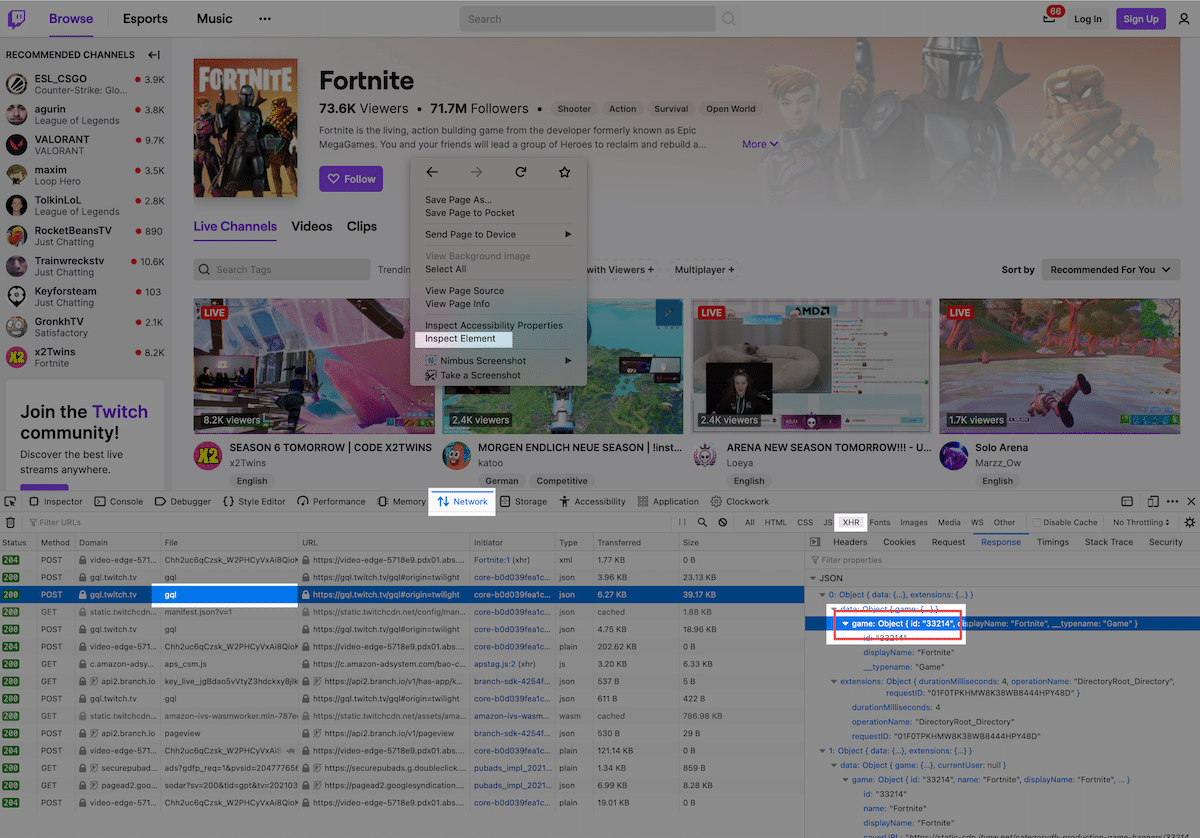
Please be aware that the workflow and interface might look different when using another browser.
Now that you have found out the Game ID, you can enter it in the plugin settings and save it.
Display Streams on the front end
There are two ways for displaying streams on the front end of your website:
Display Streams via Widgets
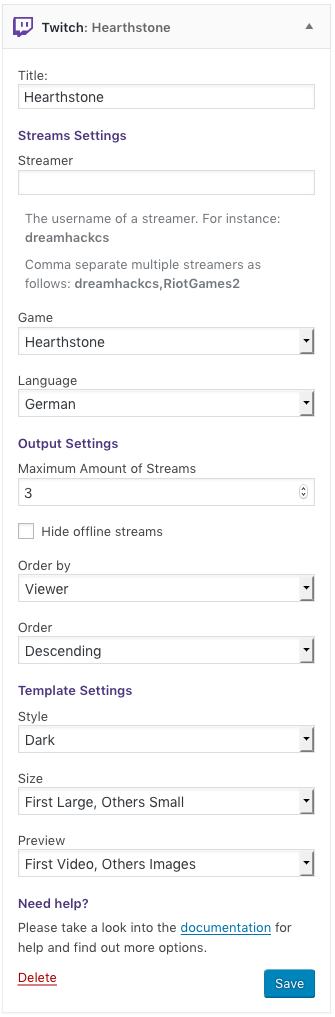
The Widgets page can be found when navigating as follows: Design – Widgets.
A widget expects either that you input the username of at least one stream, or selecting a game.
Streamer
The username of a streamer. For instance: dreamhackcs
Comma separate multiple streamers as follows: dreamhackcs,RiotGames2
Game
Choose from all available games.
Maximum Amount of Streams
Define the maximum amount of streams which will be shown. Only in the pro version, you can show more than 3 streams.
Hide offline streams
When showing certain streamer, you may want to hide streams which are currently not live.
Ordering (Pro Version only)
You may want to order streams by certain criteria such as name, game, viewer or views.
Display Streams via Shortcodes (Pro Version only)
The default shortcode expects either the username of at least one streamer or a valid game id.
Display streamer
Multiple streamers can be placed by comma separating their usernames as follows:
Display by game
Here you can find an overview of all shortcode attributes and their accepted values:
| Attribute | Values | Description |
|---|---|---|
streamer |
Usernames | Comma separate if you want to display more than one streamer |
game |
Numeric values | The game ids can be found on the plugin settings page, under “API Related Data”. |
max |
Numbers from 1 to 20 | The maximum amount of streams which will be shown. |
hide_offline |
true |
Only make use of this, if you want to hide streams which are offline. |
style |
See styles section above | Define a certain style for the output. |
size |
See sizes section above | Define a certain size for the output. |
preview |
See preview section above | Define a certain preview type for the output. |
orderby |
name, game, viewer, views |
Order streams by certain criteria. |
order |
asc, desc |
The define the order: Either ascending or descending (default). |