Here you find all relevant information, instructions and tips for installing, configuring and using the Online Learning Courses plugin. This site will be kept up2date and offers you a comfortable and smooth start.
Technical requirements
Please ensure that your web hosting meets the following requirements:
- PHP 5.3 or later
- MySQL 5.0.3 or later
- WordPress 3.4 or later (tested up to the current version)
- PHP curl extension installed
In general the above-mentioned requirements are easily met by all web hosting providers. For a fast Wordpress WebHosting we recommend Bluehost.
Plugin installation
Installation via WordPress Dashboard
- Navigate to the ‘Add New’ in the plugins dashboard
- Search for ‘online learning courses’
- Click ‘Install Now’
- Activate the plugin on the Plugin dashboard
Installation via Uploader
- Login to your WordPress dashboard
- Navigate to Plugins and click Add New
- Click “Upload Plugin”
- Select the previously downloaded zip file and confirm by clicking Install Now
Installation via FTP
- Extract the wp-udemy.zip file on your computer
- Upload the wp-udemy directory to the /wp-content/plugins/ directory
- Login to your WordPress dashboard
- Navigate to Plugins and activate the plugin
That’s it!
Inside the following chapters you learn how to configure and use the plugin correctly.
Configuration
The plugin settings page can be found when navigating as follows: Settings – UFWP Courses.
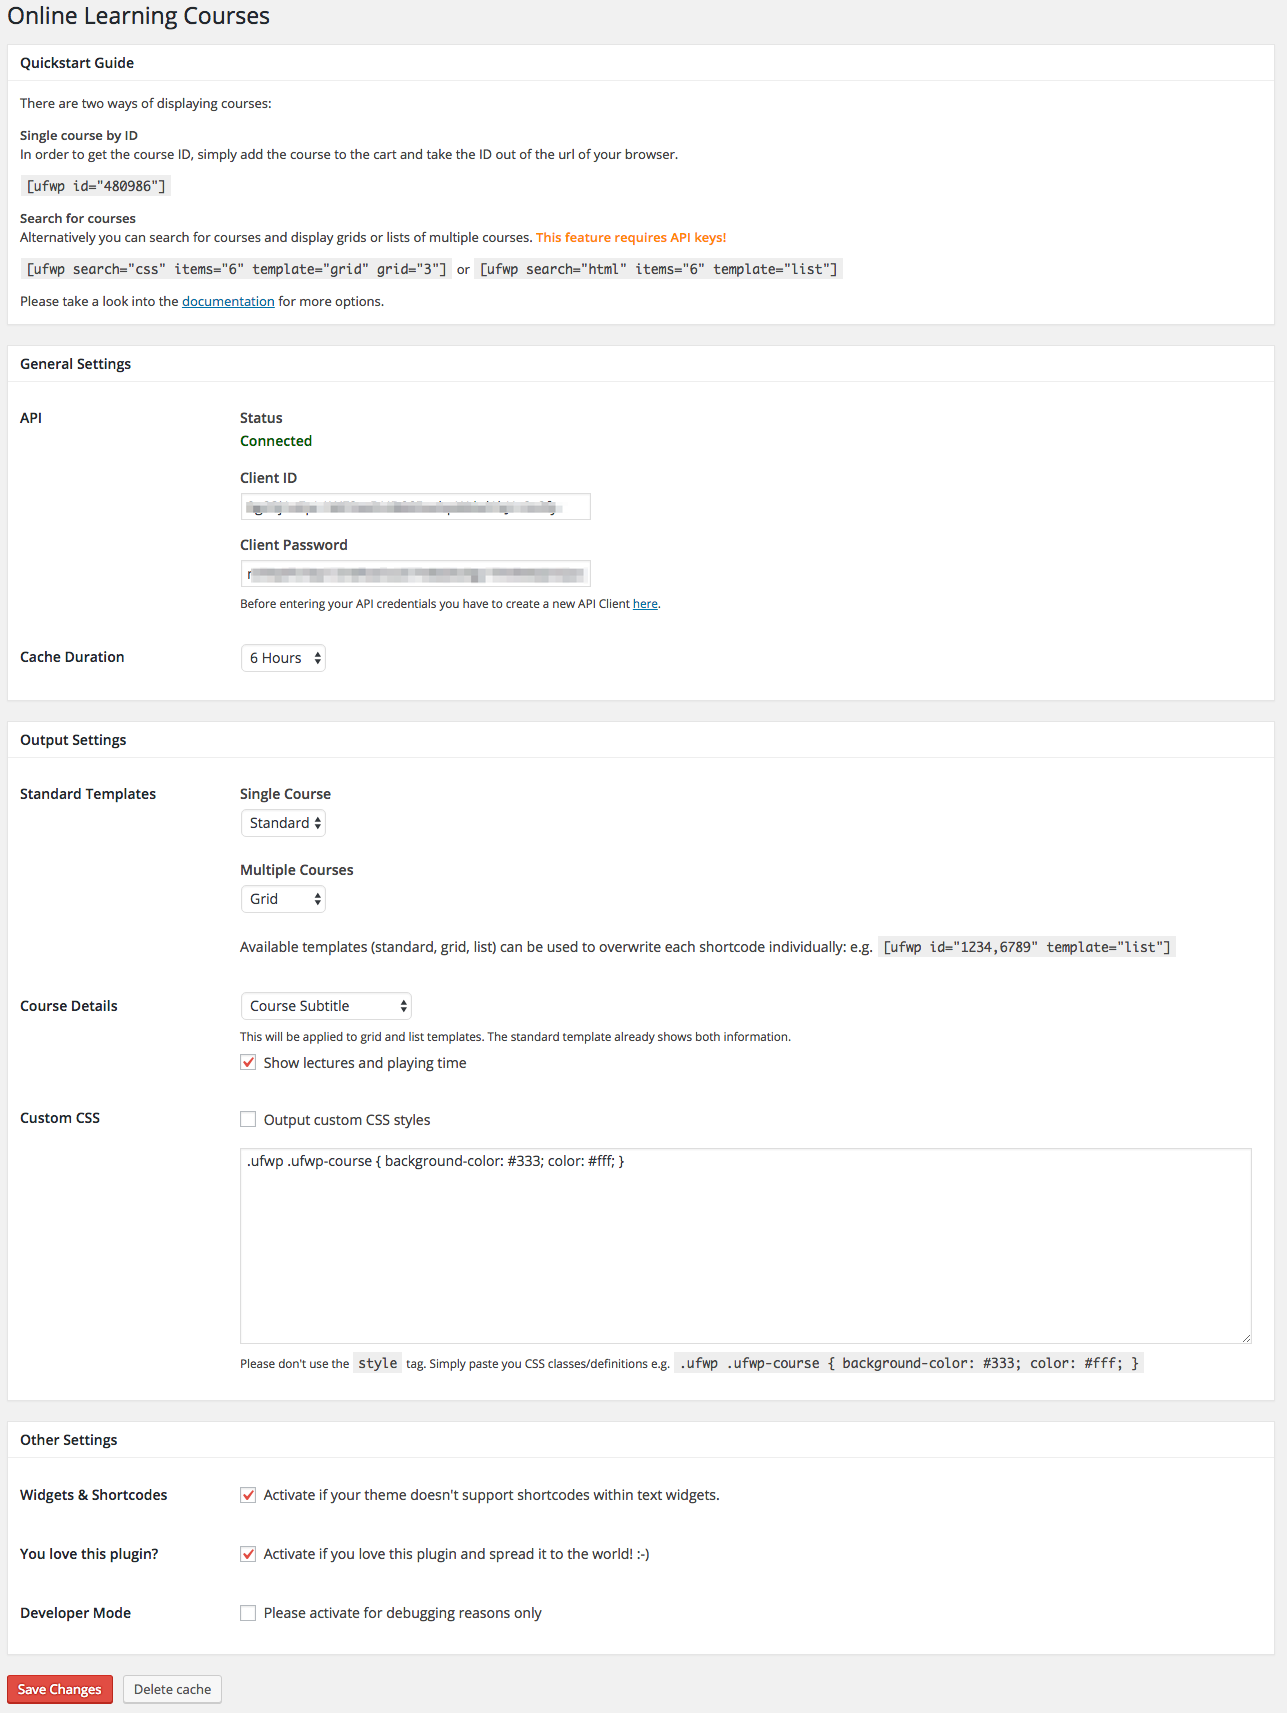
API
You must create API keys if you want to search for and display courses by keywords. Displaying single courses by their ids doesn’t require API keys right now.
In order to create a new API client for your site, please click here and follow the steps described on their page. After creating an API client it might take some hours until you receive your keys.
Caching
Data which was fetched from the API will be stored in order to improve the page loading time. After expiration the API will be called again and the stored data updated.
Templates
There are multiple templates available affecting the presentation of the courses on the frontend:
| Name | Description |
|---|---|
| standard | The default template displaying single boxes using the available content width. |
| grid | Multiple boxes side by side. Via each shortcode you can specify the cols with the attribute grid=”3″ etc. |
| list | Multiple courses listed among each other. |
| widget | Similar to the standard box template but constructed for widgets or small areas. This is the default widget template as well. |
| widget_small | Analog to the default widget template but with less data and very compact presentation. |
The default templates can be setup on the admin settings and specified via each shortcode individually as well:
A demonstration of all different templates can be found on the demo page.
Styles
There are multiple styles available affecting the presentation of the courses on the frontend:
| Name | Description |
|---|---|
| standard | Default style. |
| clean | Without borders and background colors. |
| light | Light box shadow and background colors. |
| dark | Dark box shadow, background colors and ligther font colors. |
The styles can be specified via each shortcode individually as well:
A demonstration of all different styles can be found on the demo page.
Displaying courses on frontend
In order to display courses you make use of the prepared shortcodes:
Single course by ID
The default shortcode expects a course ID:
Additionally you can string together multiple ids and display multiple courses at once:
Where to find the course ID
Unfortunately, Udemy doesn’t show the course id on their pages. But there a several ways to find it:
Way no. 1: Checkout page
- Find the course you want to promote on Udemy.com
- Click the “Buy Now” button. You’ll be redirected to the “Checkout” page.
- In the URL on the checkout page, you’ll see the course ID number (for example https://www.udemy.com/cart/checkout/express/course/380582/)
- Copy the course ID, which is 380582 in this example
Way no. 2: Thumbnail
Therefore right-click the thumbnail of the course you want to place on your site and copy the image address.
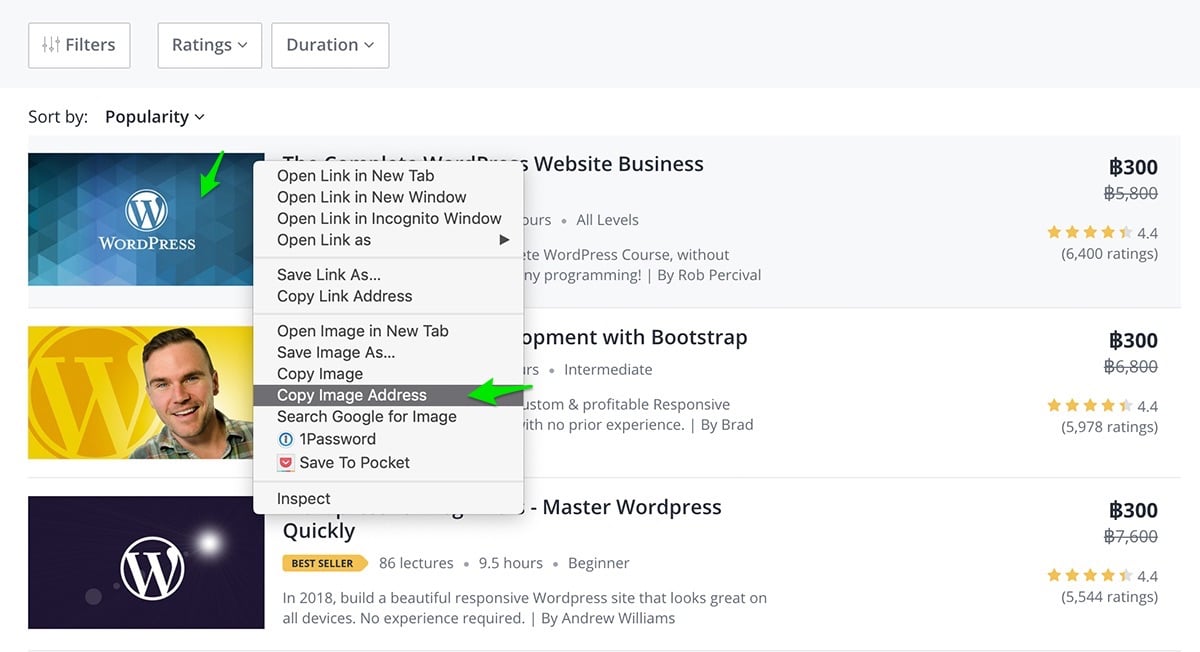
The course image URL looks as follows:
You will find the course ID behind the image size. In this example, the course ID is 520116.
Way no. 3: Thumbnail
As a course instructor, you will find the ID when editing your courses.

Search for courses by keywords
Instead of selecting specific ids you can search for courses by keywords.
| Attribute | Description |
|---|---|
| search | The keyword(s) which will be used for generating the search results. |
| items | Specify the amount of items (courses) which will be displayed. Default: 10. |
| lang | Specify the course language using language codes: e.g. “de”, “fr”. Default: English A list of all available codes can be found here and pick the ones from the second column. |
| orderby | Reorder the results as follows: “sales”, “date”, “trends”. Default: Keyword matching |